Page Contents
Git for Small Projects and Class Work
Git is a version control system (VCS), also known as a source code management (SCM) system. A VCS allows you to track changes to your code over time in such a way that previous versions are always available in case you have a need to go back to them. In larger projects VCS is very important in coordinating the work of multiple developers.
Although a VCS may sound like overkill for a personal project or class assignment, Git has properties that make it quite amenable for this use: (1) git runs locally, no need for network access to use it on your own projects, (2) git works on a per project basis, no elaborate configuration and simple per project initialization. Here is an example discussion on whether to use Git for personal projects. The overall consensus is that it is very appropriate! However, Git, is extremely powerful, it is used on some of the largest open source projects in history (in addition to powering GitHub), hence it has a large and potentially overwhelming slew of commands and options.
This guide will provide you with a minimal set of Git commands that useful in any project no matter how tiny. To keep this guide general we will only utilize the Git command line. Many GUI front ends are available for Git but they usually implement a subset of what is available from the command line, hence it never hurts to be familiar with the command line.
Additional Resources:
- git - the simple guide
- git tutorial
- Getting Started - Git Basics
- Git Branching - Branches in a Nutshell
- Good tips on undoing stuff.
Minimal Git Concepts and Commands
Git allows you to take and keep permanent "snapshots" of you project at any point in time via an action called a commit or checkin. By "snapshot" we me the state of all files and directories in your project at a particular point in time. This is represented in the figure below from Git-Basics.
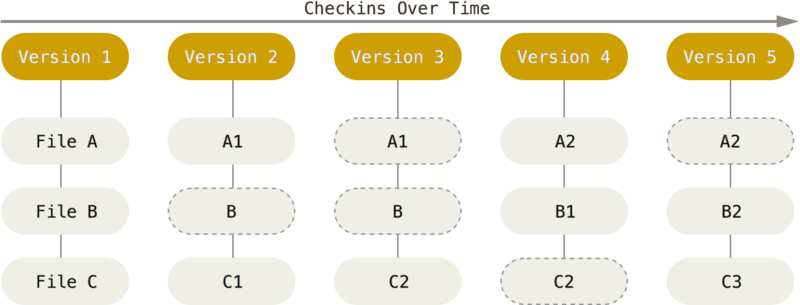
All these snapshots are saved in a very efficient form in the git repository. The git repository is simply a directory .git at the top level of your project directory that Git will maintain within you project directory. Do not accidentally delete this directory!
As the pro-git book (free) states:
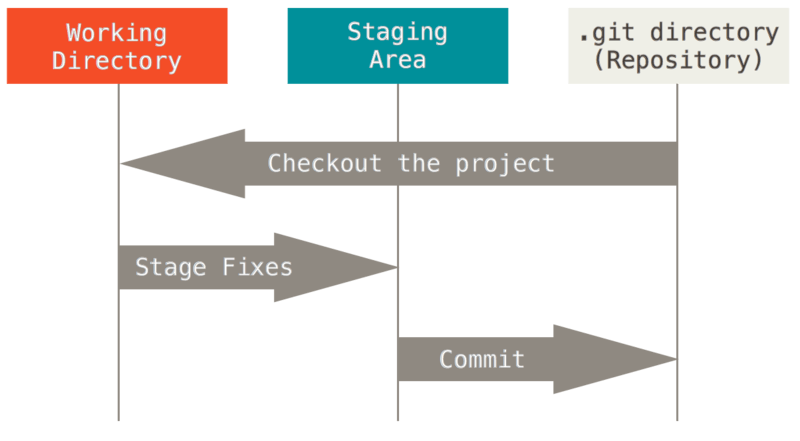
The basic Git workflow goes something like this:
- You modify files in your working directory.
- You stage the files, adding snapshots of them to your staging area.
- You do a commit, which takes the files as they are in the staging area and stores that snapshot permanently to your Git directory.
You can always ask git about the status of your project, i.e., files in your working directory. Files can be in the following states:
-
Tracked: Files that were in the last snapshot
- unmodified
- modified
- staged
-
Untracked: Anything in your working directory that was not in the last snapshot, has not been staged, or has not been ignored
The concepts so far allow for a single "line" of development, however the power of git comes from its ability to branch off a new line of development from any commit point. This is what allows you to go back to a previous "snapshot" in time of your project and start working from that point, i.e., you set up a new branch. Branches in Git are inexpensive computationally and storage wise (this is not true of all VCSs), so you can make frequent use of them as the Tutorial section will demonstrate.
In the next section we present a summary of a minimal set of commands that we'll use in the tutorial and that you may want to use with you personal projects. Then the tutorial section will put these concepts into action!
A couple final remarks:
-
Git works best with text files rather than binary files, though it can handle both.
-
I take "snapshot", i.e., commit my work rather frequently, especially after I've gotten something to work! Hence multiple times a day or more would not be unusual. When working on a class assignment I might make a commit after finishing each problem or sub-problem.
-
I set up a new branch either because I've messed up and need to start work from an old commit point, or I'm about to venture into the unknown, i.e., use a new library or framework, work on a new piece of functionality that I'm uncertain about. You can always add, delete, or rename branches. Note that combining branches requires merging which we won't cover here. See Basic Branching and Merging.
-
In some courses that I teach I have the students branch for each weekly homework yet as portions of projects carry over from previous weeks assignments.
Command Summary
Commands to initialize, add, and commit files/directories.
| Name | Description |
|---|---|
git init |
Put a project directory under version control |
git status |
Lists the state of files in the working directory. The -s option produces a shorter output. |
git add files |
Adds files to the staging area. Common file wild cards are supported. |
git commit |
Commits staged files. |
git commit -a |
Stages and commits all modified tracked files. |
git commit -m "message..." |
Use the -m option with a double quoted string to set a commit message on the command line. |
git mv |
Used to rename a file in git and in your directory. |
Commands to recover from recent goofs or visit the past
| Name | Description |
|---|---|
git checkout fileName |
Puts the file fileName back to its condition after the last commit. |
git reset --hard |
Puts all the tracked project files back to their state at the last commit. |
git log |
Used to view the commit (snapshot) history. |
git checkout commitHash |
Sets your tracked files to their state at a particular commit. Good for looking but don't work on these files, set up a new branch for that. |
Commands for working with Branches
| Name | Description |
|---|---|
git branch |
List the names of all the available branches. |
git branch -v |
Lists all available branches and some info on their last commits. |
git branch branchName commitHash |
Creates a new branch called branchName at the commit point indicated by commitHash. |
git branch branchName |
Creates a new branch called branchName at the current "commit". |
git checkout branchName |
Checks out the branch branchName into the workspace. |
git checkout -b branchName |
Creates a new branch called branchName from the current commit and checks it out to the workspace. |
git branch -m oldBranchName newBranchName |
Use this to rename your branches. |
Personal Project Git Tutorial
Setup a Project for Version Control with Git
- Create a new directory for this project. Name it anything you like, we'll refer to it as ProjDir here.
- In the ProjDir create a file called sample.txt. Add some text to the file. I added "My first edit of this file." to the file.
- Version control this project. From within the project directory run the command
git init. This will create a.gitdirectory and set you up to start version control.
Adding project files to version control
- Type the command
git status. This should tell you that you have an untracked file sample.txt. - To "stage", i.e., start tracking the sample.txt file use the command
git add sample.txt. Run thegit statuscommand again to see that the sample.txt file is ready to be "committed". - Use the command
git commit -m "my first commit"to commit the file to version control. This gives us a snapshot of our project state at the time a commit. The portion after the-margument is a string you use to describe the commit. - Use the
git logcommand to see a history of your commits. I get something like:
        commit 91581331aa8b1f31b19040b8b7f2376a988ff88b
        Author: Greg Bernstein <gregb@grotto-networking.com>
        Date:   Sun Feb 19 14:31:07 2017 -0800

            My first commit
-
The hexadecimal string following the commit, i.e., 91581331aa8b1f..., is the git commit hash and this uniquely identifies this "snapshot" of our project and can be used to go back to the state of all our tracked files at this point in time. Yours will be different from mine!
-
Add a file named second.txt (put some text into it) and add some more text to the sample.txt file. Run
git status. You should see second.txt listed as untracked and the sample.txt file listed as modified. Run thegit add second.txtto start tracking second. Rungit add sample.txtto stage the modified file for commit along with the newly tracked second.txt file. Rungit statusto see if all the files you want are ready to be committed. Rungit commit -m "Added file and edited other file"Rungit logto see the snapshots (commits) of the project over time.
Going back in Time
-
Going back to the previous commit just to take a look. Using the information from the
git logcommand I can go back to any point in time by using thegit checkout COMMIT_HASHcommand. Go back to your first commit this way. For me I usedgit checkout 91581. Note that you don't need to use the full 40 character hash code, just enough characters to uniquely identify the commit. -
Run the
git statuscommand. What does it say about the HEAD? Did yoursecond.txtfile disappear? Can we get it back? How? To get back to the last place we were working on a particular branch we can use the the commandgit checkout master. Where master is the default name given to the branch we've been working on. -
Run the
git statuscommand and make sure you get:
On branch master
nothing to commit, working directory clean
Recovering from some types of Mistakes
-
Now we'll try recovering from a simple mistake. Delete the sample.txt file. Oh, no, we want it back!!! Type
git statusyou'll see that git knows the file has been deleted. It also tells you how to get it back, i.e., use the commandgit checkout sample.txt. Did you get the file back? -
Now we'll recover from a bigger mistake. Remove both sample.txt and second.txt files. To get both of these back (or remove all changes you've performed since the last commit) use the command
git reset --hard. -
As long as your
.gitdirectory is intact you can get back to any previous snapshot using the methods we've seen. However, if the.gitdirectory gets deleted or corrupted there is nothing git can do to help you. Hence you still need to perform regular file backups.
Ignoring things
Frequently additional files are produced by the tools we use. Git will warn you about untracked files. Here we will look at how to ignore specific files and directories.
-
Create files
alpha.tmpandbeta.tmpin your project directory. Rungit statusand you will see these show up as untracked. -
Create a file called
.gitignore. Add the following line:
*.tmpRun git status. Do the *.tmp files still show up? Did the .gitignore file show up. If so add it and commit it.
- Sometimes we'll have entire directories within our project that we'll want to ignore. Create a new directory within your project directory called
anotherDir(or anything you'd like to call it). Create three files in this directory, I'm calling minestuff1,stuff2,stuff3. Rungit statusand you'll see that the directory is listed as untracked. To ignore this entire directory add the following line to you.gitignorefile.
/anotherDirUse git status to see that this entire directory is now ignored by git. Use the command git commit -a -m "Updated .gitignore file" to commit the modified .gitignore file.
Branching
Suppose we wanted to go back to a particular previous point in time ("snapshot") of our project and start working from that point from now on. Or suppose our project was in good shape but we were about to try some major changes and wanted to make sure we could easily go back to where we were before the major changes. Both cases call for creating a new branch. We'll look at both.
Branching from a Previous Commit
-
Let's add and commit some more stuff first. Create a file within your project directory called
sunflower.txtand add some text to it. Also add another line to thesample.txtfile. Note that you can add both files to the staging area with the commandgit add sample.txt sunflower.txt. Usegit commit -m "Added sunflowers!"to commit these changes. Usegit statusto check that everything is nice and clean. -
Now suppose we change our mind and don't think we want to continue with the changes we just made in the previous step. What we will do is start a new development branch from before the previous commit (or anywhere we want!). The general form of the command we'll use is
git branch branchName startPoint. Use thegit logcommand to find the git hash you want to use as your start point. For me this is4f9d2409d3and so I'll use the commandgit branch noSunflowers 4f9d2409d3. To see if this did anything issue the commandgit branch(no arguments) to list the available branches. I get:
$ git branch
* master
  noSunflowers
The "*" indicates the branch being currently used. Take a look at the files currently in your directory and the contexts of the sample.txt file. Now issue the command git checkout noSunflowers. What happened to the sunflower.txt file? Did the sample.txt file change? Issue the git status command. What branch does it say you are on? Log at the commit history with the git log command. Does it show the commit associated with the sunflower modifications? Want to go back to sunflower stuff use the command git checkout master. You can name the branches anything you like, but its best to use names that won't confuse yourself. Note that master is just a default name that git gives the initial branch. You are allowed to change it on your projects.
- To avoid confusion lets change the name of the branch master which contains our sunflower related modifications to sunflowers. Use the command
git branch -m master sunflowers. Usegit branchto see that the name change was successful. Also for practice change the name of thenoSunflowersbranch tomain, i.e., usegit branch -m noSunflowers main. Switch to the main branch withgit checkout main.
Branching Prior to New Work
In the previous example we saw how to go back to any commit, i.e., "snapshot", of your work and branch from it so you can continue working from that point onwards. However, its even simpler to create a branch prior to:
-
Doing a major code reorganization. Say you finally got you code working, but its ugly and you wouldn't want to submit it as an assignment or project in class. Commit it first, then create a branch for clean up. Then in case you break the code during clean up you can easily switch back and forth between the branches to work out any problems.
-
Adding new feature, capability, bug fix to your project. These are some of the most common reasons to set up a new branch and you'll see these mentioned in the Pro-Git Book.
-
Incorporating a new third party component or library into your project. Many times incorporating a new component or library into a project involves modifying a number of files. Some of these maybe associated with your development environment others with you project files. If you find the library or component doesn't suit your needs its nice to easily go back to your project as it was before you tried using the component/library.
In the git version control system branching is fast and very cheap. If you've used other version control systems (VCS) this might not have been the case and branching was considered a rare event and may have even required the VCS administrator do some special stuff. In git you should get used to branching for any of the reasons cited above (and others that I may not have mentioned). For personal projects (including longer class assignments) branches allow you to explore different options or solutions without the risk of losing any of your work!
Example
-
Suppose that instead of the sunflower project addition that we previously tried, we'd like to try an addition having to do with cactus. Use the command
git branchto see a list of branches we've created. Switch to the main (or whatever you called it) branch if you are not already there with the commandgit checkout main. -
We can create a new cactus branch starting from the HEAD of the main branch with the command
git branch cactus. We switch to using that branch with the commandgit checkout cactus. Note we can combine both these steps with thegit checkout -b cactuscommand, i.e., creates a new branch and immediately switches to the new branch named cactus. -
Create a file called
myCactus.txtand add some text to it. Edit thesample.txtfile by adding some more text to it. Usegit add myCactus.txtto stage the new file then usegit commit -a -m "Fun with a Cactus"to commit the added file and the modifiedsample.txtfile. -
To see all your branches along with information on the last commit on each branch use the command
git branch -v. Note that thegit logcommand will only show you information about the current branches history. -
Use
git statusto check that your working directory is clean. Modify themyCactus.txtfile by adding some text. Usegit statusto see that git knows the file has been modified. -
Try using the command
git checkout sunflowersto switch to the sunflowers branch. Were you able to switch branches? Why or Why not? Is this a good thing? Explain. On the cactus branch commit your changes to themyCactus.txtwith thegit commit -a -m "Some changes to my cactus"command. -
Now try using the command
git checkout sunflowers. Did it work? If not usegit statusto help you figure out what went wrong. What files are now in your directory? -
You can easily switch to the main, sunflower, or cactus branches with the
git checkout branchNamecommand.