General Instructions
The goal of this homework is to get you started with all three of the technologies that we will be using all semester: HTML, CSS, and JavaScript. In addition you will start building a website for a fictitious (imaginary) club of your choosing.
Create and Use a new Branch hw2
We will create a new git branch called hw2 for use in this assignment. The branch you create must exactly match the one I’ve given you for you to receive any credit for this homework.
Prior to creating this new branch make sure your working directory is “clean”, i.e., consistent with the last commit you did when you turned in homework 1. Follow the procedures in GitHub for Classroom Use to create the new branch, i.e., git checkout -b hw2. Review the section on submission for using push with a new branch.
Use README.md for Answers
You will modify the README.md file to contain the answers to this homework.
# Homework #2 Solution
**Your name**
**NetID: yourNetID**
Questions
Question 1. (15 pts)
Over the semester we will be creating a web site, server, and web app for an imaginary club of your choosing. This cannot be for a real club that already exists! You will make this available over the internet in future assignments so (1) be reasonable about content, (2) take care about your privacy (don’t put information on the site that you consider private). You are allowed to have fun with the site/app as far as content and styling but you must meet the specifications in the homework.
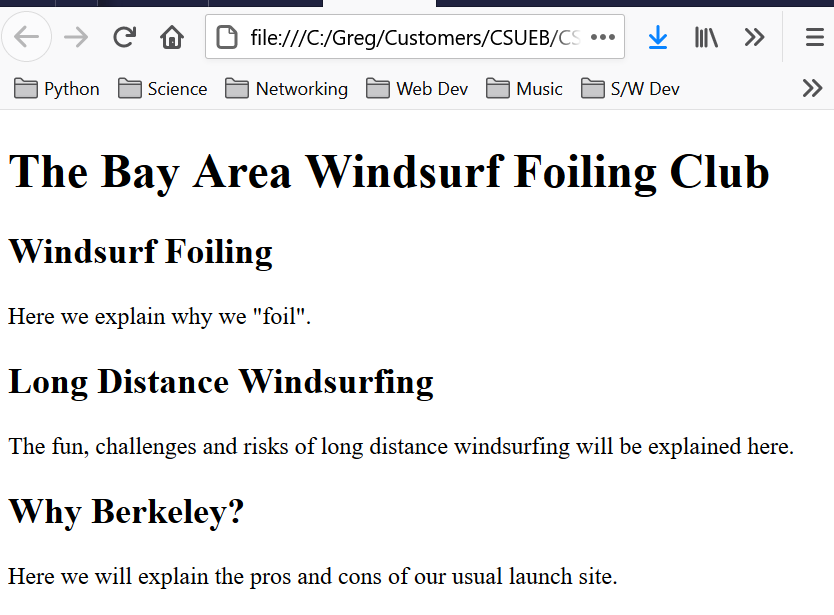
What kind of club? Whatever you want! My club (which is based on reality but is not a real club) is the Bay Area Windsurf Foiling Club. I use this version to share useful information about tides and currents with other windsurfers and kitesurfers (two types of sports). This is a refined and expanded version of what I started (and you will see) in this class. Note that I removed login and activities pages from the published version but you will see them in the examples I show you. You cannot use my club or club pages!
Having trouble deciding? Pick a hobby or sport, then pick a region, state, city, or district. I like growing sunflowers and I live in Fremont, so I could make the “Fremont Sunflower Growers Club” and then make up things from there. With some extra work after class is over you could turn this into a “portfolio site” to show potential employers. We will be concerned with achieving specific functionality with our site/app rather than completing all the details and tests needed for a deployed product.
1(a) Create a directory to hold your site
Within the top level of your repo create a directory name clubProject to hold all your site files. We will add more subdirectories as needed.
1(b) Create Three Outline Pages
Start with the HTML document outline from the course notes and add needed elements to pass the HTML Validator. You will need a “home page” (index.html), a “login page”, and a “club activities page” to start. Only the “home page” must have the name index.html, the other pages can have file names of your choice (no spaces in file names or weird characters!!!).
Read the explanatory text describing the <main> element in the HTML5.2 Specification – main. Add a <main> element to the <body> of each of your pages. Give each page a unique <title> in the <head> and put some content at least a heading and paragraph in the <main> element so we can tell the purpose of the page.
Answer the following questions: According to the HTML5 specification should you: (i) Put site wide navigation into the <main> element? (ii) Should you put common banners (e.g., site logo) in the <main> element? (iii) Should you put copyright notices in the <main> element?
List the file names of your pages here.
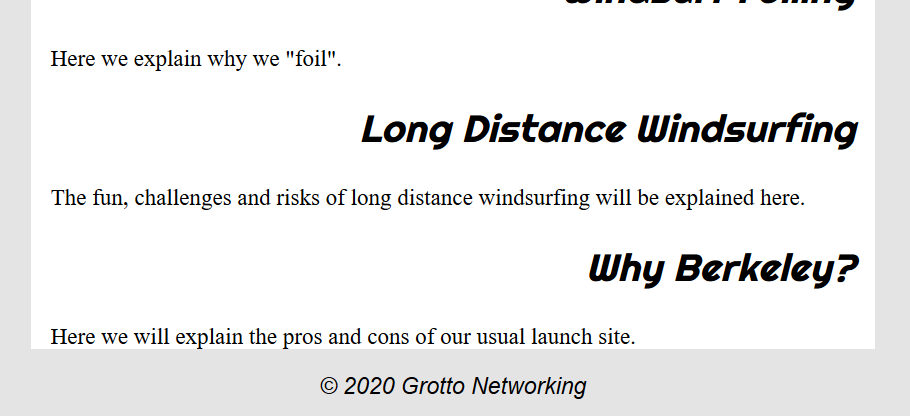
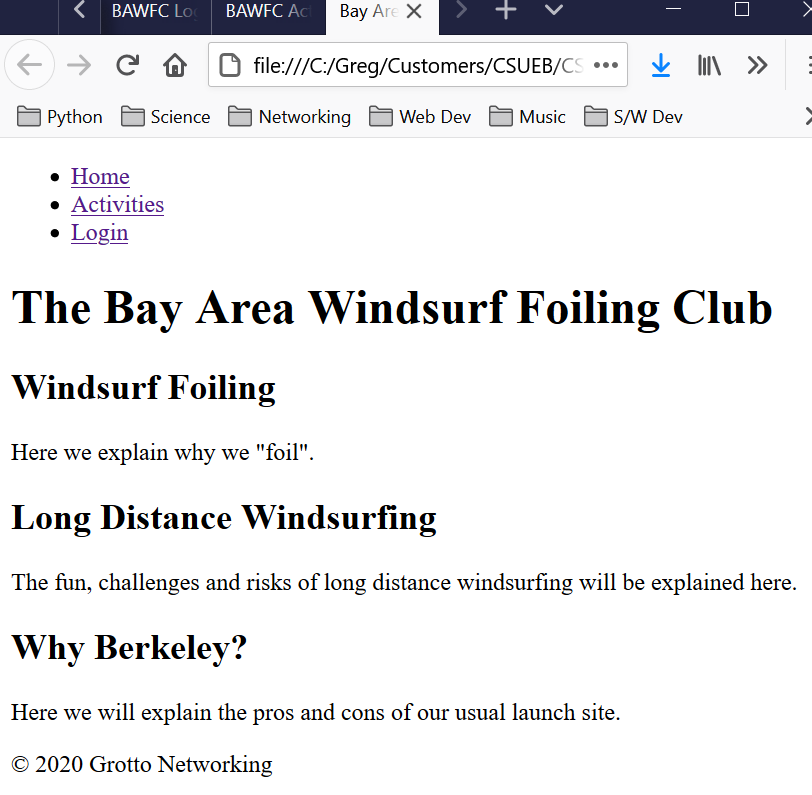
1(c) Content for the Home Page
Describe what the club is about. Use at least a couple <p> and <h1>, <h2> elements. In question 2 you will add more HTML structure.
My unstyled page looks like:
1(d) Content for the Login Page
In the <main> content element add an HTML form element, i.e., <form> element. Don’t worry about any attributes for this element, we are just prototyping at this point. Nested in the <form> element include <label> elements and <input> elements. Do not use any attributes on the <label> elements. The <label> elements will contain the text that introduces the <input> elements. On the <input> elements we will use the type attribute. We are using the <input> elements to let the user specify their email and password. Look at the documentation for <input> elements to choose the best value for the <input> elements type attribute. Also add a login <button> to the form element.
My unstyled login page looks like:
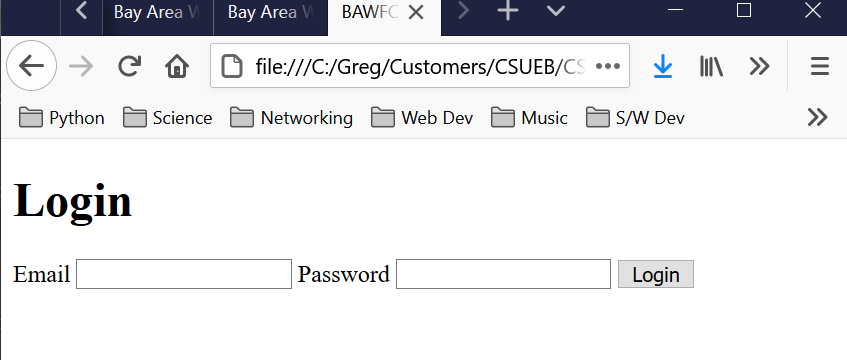
Note: this page has no real functionality it is just a prototype!
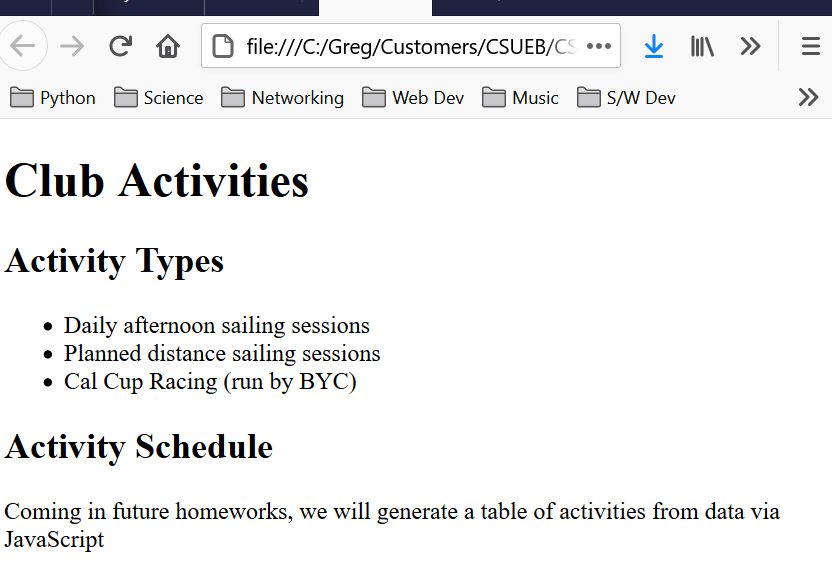
1(e) Content for the Activities Page
Put in “work in progress” placeholder text for the activities page since in later assignments we will generate the activities HTML content via JavaScript and JSON data.
My unstyled activities page looks like:
Question 2. –More HTML Structure– (15 pts)
2(a) The <header> element
According to the HTML5.2 Spec – header we can use the <header> for “introductory” content. Let’s use it to hold info about each page, such as an <h1> element related to the pages purpose. Should we put this inside or outside the <main> element according to the specification?
Write your answer here and add the <header> element in the appropriate place in each of the files (and have it contain the appropriate content).
2(b) Copyright and credits
According to the HTML5.2 Spec – footer a <footer> element is a good place to put a copyright notice, author info, etc…
Is it okay to put the <footer> in <main>? What about as the last item in the <body>? Would you prefer one over the other? Why? Add a <footer> to all your pages containing the copyright symbol © = © the year and your name, or club name (whichever you want this will be on the internet eventually).
2(c) Navigation
The users of your club need an easy way to navigate your clubs website. We’ll use a <nav> element as described in the HTML5.2 Spec – nav. Within your <nav> use an unordered list, <ul> of links, <a> to each of the pages. Use relative URLs in all your links. Create this “navigation menu” once and then copy and paste it into all your other pages. Test that you can navigate to all the pages in your site via this “menu”.
Take a screenshot of your clubs home page (I should see navigation links and the footer) and show it here. The screenshot of my unstyled page looks like:
Question 3. (10 pts)
JavaScript: strings and numbers, conversions, hex and binary. MDN string string manipulation methods.
3(a) String to number conversions
When we work with various HTML input controls, the raw data we get is usually in string form. Hence we need a way to convert from strings to integers or floating point numbers. In JavaScript we use two global functions for this parseInt and parseFloat.
Run the following JavaScript code in your browsers developer console. In the answer section provide explanations to my comments and take a screen shot of the last few results and include that with your answer. Make sure to put your name in place of the “YourNameHere” portion of the string.
parseInt('hello'); // (i) Why? and What is a NaN?
parseInt('12hello'); // (ii)
parseInt('1010', 2);  // (iii) What does this do?
parseInt('hi5'); // (iii) Is this the same as (ii)

parseFloat('3.145YourNameHere'); // Put in your name!
parseFloat('YourNameHere2112'); // Put in your name!
3(b) Number to Strings
When we display numbers we generally want to format them in a way appropriate to the application. We can do this with the following methods from JavaScript’s Number class. These include: toString, toPrecision, toFixed as well as others.
Run the following JavaScript one line at a time in your browser’s developer console, answer parts (i)-(iii) detailed in the comments and show a screenshot of your answers to (i)-(iii).
pi = Math.PI;
h = 6.62607004e-34;
mpg = 343/11.8;
mpg.toString(); // Example, gives full "precision"
// (i) Use toFixed to get a string of the first 5 digits of pi
// (ii) Use toPrecision to get h (planck's constant) to 3 sig figs
// (iii) Use toFixed to get the mpg to a tenth of a gallon
3(c) Single and Double quote strings
In this problem we will also practice using the most common debugging method in all of Javascript: console.log(). Single quote and double quote strings are the same in JavaScript. Let’s test that this is true. Run the following code one line at a time in your browser’s developer console. Provide answers to the questions in the comments and a screen shot (partial is fine) of the developers console with the results.
a = "Your Name Here"; // double quote string
b = 'Your Name Here'; // single quote string
console.log(a === b); // Check if these are equal
// Why bother with two string delimiters?
test = "It's a pain to always escape quotes"; // (i) does this work
console.log(test);
// test = 'It's a pain to always escape quotes'; // (ii) why not this?
// console.log(test2);
test3 = 'It\'s a pain to always escape quotes'; // (iii) What is going on here
console.log(test3);
(d) Simple string manipulations
The String class contains a number of helpful functions among the many are: includes, replace, split, toUpperCase, toLowerCase. Always check the String methods before writing something yourself. Let’s try some of these.
name = "Your Full Name here"
uname = name.toUpperCase(); // (i) What?
console.log(uname);
lname = name.toLowerCase(); // (ii) What?
console.log(lname);
// Explain what the following two lines do and show a screenshot
// of the results.
console.log("Your name includes an 'a': " + uname.includes('A'));
console.log("Your name includes an 'i': " + lname.includes('i'));
(e) Backticks and template strings
There is yet another string that was added to ES6, the template string. This is extremely handy when adding elements to the DOM. It uses backticks and allows for variable substitution within the string. Let’s try a simple example. Take a screenshot of your console for your answer.
prof = "Dr. B.";
course = "CS351";
student = "Your name here"; // Your name here
message = `${student} is coding the web in ${course} with ${prof}. `;
Question 4. (10 pts)
Initial styling for your club website. Create a stylesheet named club.css and put it in the top level of your clubProject directory. Link it in the <head> of all your site files.
(a) Header styling for each page
Choose a different font than the default for your <h1> in the <header> for each page. Center that text.
Optional choose a “web font” for the above. “Web fonts” can be obtained/downloaded from Google Fonts, Rostype, The league of movable type, etc… For usage information see MDN Web Fonts.
Tell me what font you are using here.
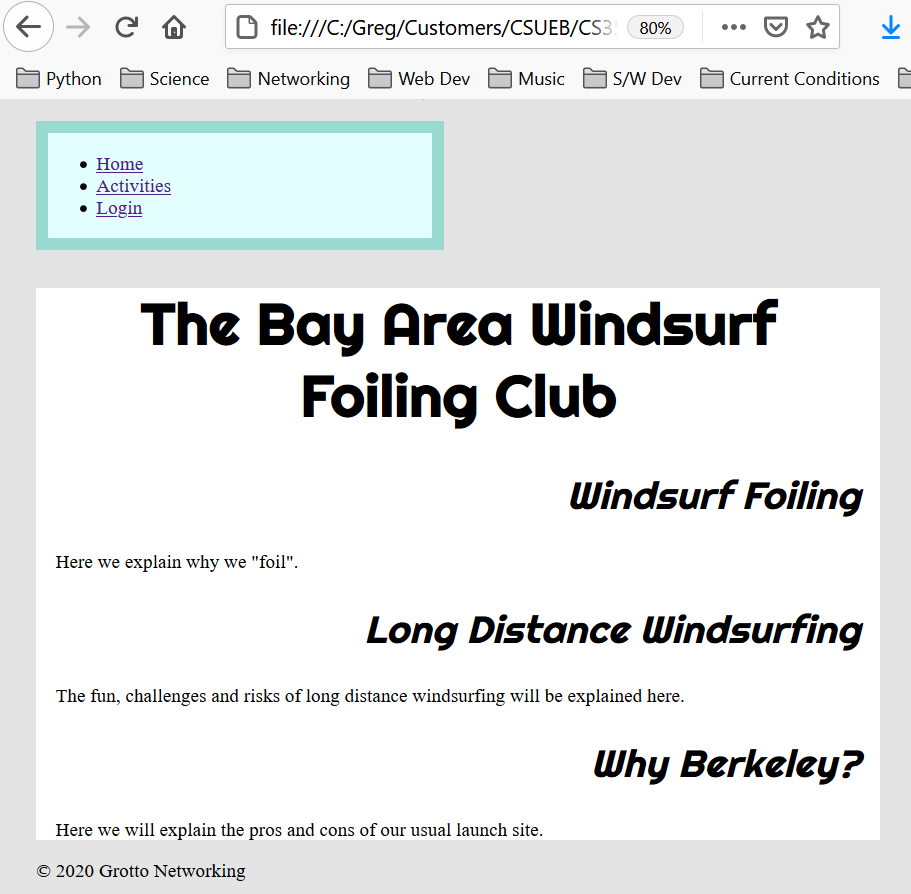
(b) Box model for body, main, nav
Set the background color for the <body>, <nav> and <main> elements. The <body> color should be different from <nav> and <main>.
Adjust margin and padding to something reasonable.
Limit the width of the <nav> with the max-width property. Put a border of some type around the <nav> (we’ll style the insides later).
Take a screen shot and include it here. I get something like:
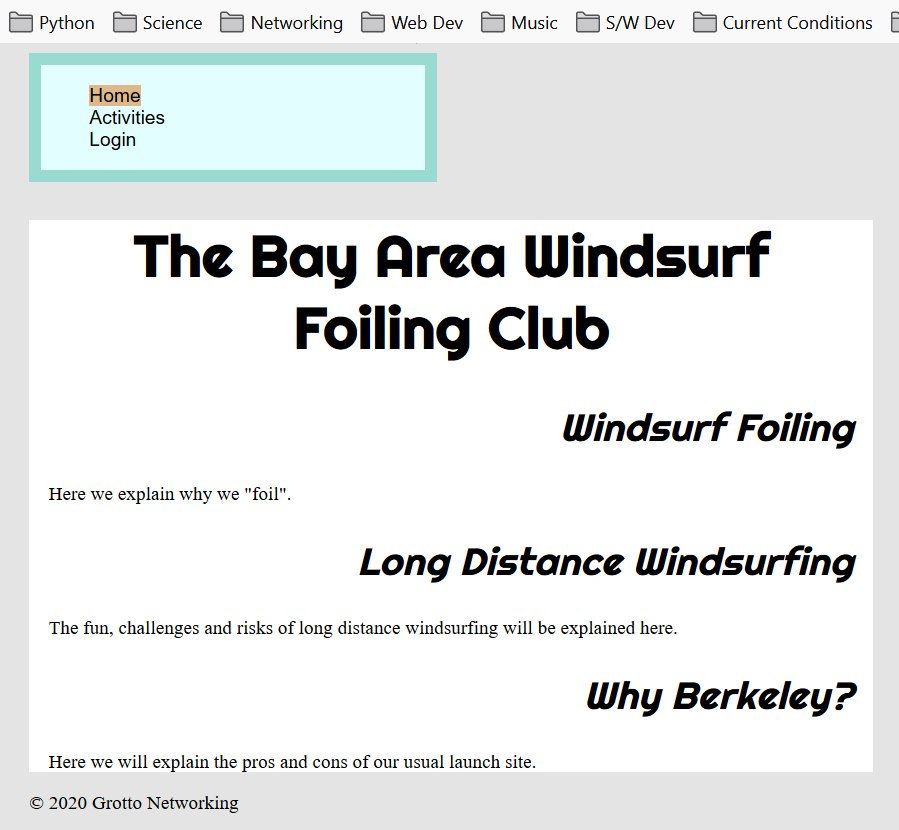
(c) Navigation Styling
Now let’s make then <ul> in the <nav> look more like a menu and less like a bullet list. There is an entire MDN tutorial on list styling, but we are basically going to turn off most list styling for the list in the <nav> by setting list-style-type: none. Set a background color for the <li> element that is “active”. I turned off link styling by setting text-decoration: none, and on the a:visited pseudo-class setting the font color to black (optional). I also set up hovering over the links (optional).
Take a screen shot of your styled page and show it here. Mine looks like:
(d) Footer styling
Center the footer and adjust the font size if you want. Take a screen shot showing part of your page and the footer. Also show your complete CSS file here.
My screen shot looks like: