More Interactivity with React
Dr. Greg Bernstein
Updated April 20th, 2021
More Interactivity with React
Learning Objectives
- “Controlled component” Basics
- Create and use dynamic form components in React
- See array methods in use for changing array state variables
- See a closure based approach for dealing with
this - Design React data flows with props and functions
Readings
Basic Forms
Controlled Components
- Idea: Tie HTML widget state to React class component state
- Benefit: widget inputs are easily available for advanced validation and posting
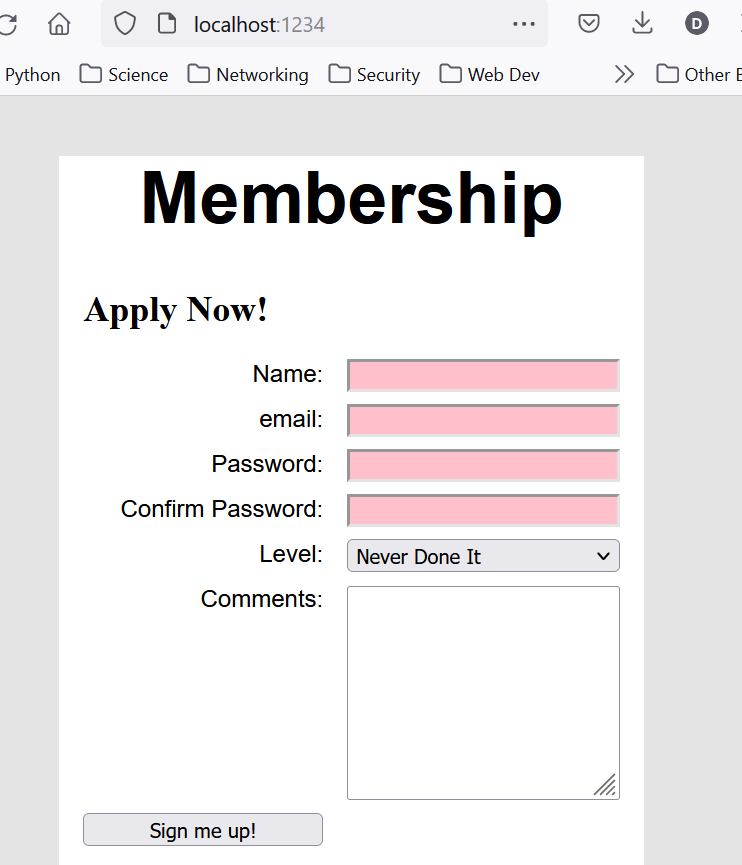
- Example: Club membership application.
React Form Mockup

Convert Web Page Form to React
- All
<input>need a closing</input> - All
classattributes must be changed toclassNamesimilarly for other attribute names - Used previous CSS
- Should get rid of ids not used for styling.
Membership Component 1
From index.jsx in branch BasicForm1
class App extends React.Component {
    constructor(props) {
        super(props);
        this.state = {};
    }

render() {
    return (
      <main>
        <header>
          <h1>Membership</h1>
        </header>
        <h2>Apply Now!</h2>
        <section id="Application">
          <label>Name:</label>{" "}
          <input
            required
            minLength="1"
            maxLength="30"
            id="Name"
            type="text"
          ></input>
          <label>email:</label>
          <input required maxLength="50" id="Email" type="email"></input>
          <label>Password:</label>
          <input
            required
            type="password"
            minLength="8"
            maxLength="20"
          ></input>
          <label>Confirm Password:</label>
          <input
            required
            type="password"
            minLength="8"
            maxLength="20"
          ></input>
          <label>Level:</label>
          <select required>
            <option>Never Done It</option>
            <option>Beginner</option>
            <option>Intermediate</option>
            <option>Foils to TI and Back</option>
            <option>Racer</option>
          </select>
          <label>Comments:</label>
          <textarea name="comments" rows="8" cols="20" id="Comments"></textarea>
          <button id="Apply">Sign me up!</button>
        </section>
        <section id="ThanksDialog">
          <div className="message">
            <h3>Thanks for Signing Up</h3>
            <p id="UserInfo"></p>
            <button id="Close">Close</button>
          </div>
        </section>
      </main>
    );
    }
}
Add State and Link it to Widgets
- Add state to class component for each input, select, and textarea
- Add
valueattribute to each widget and “link it” to appropriate state - Add
onInput,onChangeor other handler as appropriate (I used arrow functions since these were so small)
Membership Component V2
From index.jsx in branch BasicForm2
class App extends React.Component {
    constructor(props) {
        super(props);
        this.state = {name: "", email: "", password: "", confPassword: "", level: "Beginner", comments: ""};
    }

render() {
    return (
      <main>
        <header>
          <h1>Membership</h1>
        </header>
        <h2>Apply Now!</h2>
        <section id="Application">
          <label>Name:</label>{" "}
          <input
            required
            minLength="1"
            maxLength="30"
            id="Name"
            type="text"
            value={this.state.name}
            onInput={(event) => this.setState({ name: event.target.value })}
          ></input>
          <label>email:</label>
          <input
            required
            maxLength="50"
            id="Email"
            type="email"
            value={this.state.email}
            onInput={(event) => this.setState({ email: event.target.value })}
          ></input>
          <label>Password:</label>
          <input
            required
            type="password"
            minLength="8"
            maxLength="20"
            value={this.state.password}
            onInput={(event) => this.setState({ password: event.target.value })}
          ></input>
          <label>Confirm Password:</label>
          <input
            required
            type="password"
            minLength="8"
            maxLength="20"
            value={this.state.confPassword}
            onInput={(event) =>
              this.setState({ confPassword: event.target.value })
            }
          ></input>
          <label>Level:</label>
          <select
            required
            value={this.state.level}
            onInput={(event) => this.setState({ level: event.target.value })}
          >
            <option>Never Done It</option>
            <option>Beginner</option>
            <option>Intermediate</option>
            <option>Foils to TI and Back</option>
            <option>Racer</option>
          </select>
          <label>Comments:</label>
          <textarea
            name="comments"
            rows="8"
            cols="20"
            value={this.state.comments}
            onInput={(event) => this.setState({ comments: event.target.value })}
          ></textarea>
          <button id="Apply">Sign me up!</button>
        </section>
        <section id="ThanksDialog">
          <div className="message">
            <h3>Thanks for Signing Up</h3>
            <p id="UserInfo"></p>
            <button id="Close">Close</button>
          </div>
        </section>
      </main>
    );
    }
}
Example Validation and Submission
- Will run validation check on every state update in render
- Generate error or welcome message but don’t display it
- Will show error or user information when apply button is clicked
- Add state for dialogClass change this to show/hide dialog
<section>
- Add state for dialogClass change this to show/hide dialog
Membership Component V3
From index.jsx in branch BasicForm3
class App extends React.Component {
    constructor(props) {
        super(props);
        this.state = {name: "", email: "", password: "", confPassword: "", level: "Beginner",
        comments: "",
    dialogClass: ""};
    }

submitApplication() {
    // In a real application we'd actually send data to a server here
    // But all we'll do here is show the welcome/thanks dialog
    this.setState({ dialogClass: "show" })
}

render() {
    // Check if password and confirmation passwords match here
    let message = null;
    if (this.state.password.length < 8 || this.state.password !== this.state.confPassword) {
        message = <p>Password too short or not confirmed.</p>
    } else { // Everything is good create a welcome message
        message = <p>Welcome <em>{this.state.name}</em>,{" "}
        your email is <em>{this.state.email}</em>,{" "}
        your level is <em>{this.state.level}</em>{" "}
        and you had the following comments: <em>{this.state.comments}</em></p>
    }
    return (
      <main>
        <header>
          <h1>Membership</h1>
        </header>
        <h2>Apply Now!</h2>
        <section id="Application">
          <label>Name:</label>{" "}
          <input
            required
            minLength="1"
            maxLength="30"
            id="Name"
            type="text"
            value={this.state.name}
            onInput={(event) => this.setState({ name: event.target.value })}
          ></input>
          <label>email:</label>
          <input
            required
            maxLength="50"
            id="Email"
            type="email"
            value={this.state.email}
            onInput={(event) => this.setState({ email: event.target.value })}
          ></input>
          <label>Password:</label>
          <input
            required
            type="password"
            minLength="8"
            maxLength="20"
            value={this.state.password}
            onInput={(event) => this.setState({ password: event.target.value })}
          ></input>
          <label>Confirm Password:</label>
          <input
            required
            type="password"
            minLength="8"
            maxLength="20"
            value={this.state.confPassword}
            onInput={(event) =>
              this.setState({ confPassword: event.target.value })
            }
          ></input>
          <label>Level:</label>
          <select
            required
            value={this.state.level}
            onInput={(event) => this.setState({ level: event.target.value })}
          >
            <option>Never Done It</option>
            <option>Beginner</option>
            <option>Intermediate</option>
            <option>Foils to TI and Back</option>
            <option>Racer</option>
          </select>
          <label>Comments:</label>
          <textarea
            name="comments"
            rows="8"
            cols="20"
            value={this.state.comments}
            onInput={(event) => this.setState({ comments: event.target.value })}
          ></textarea>
          <button onClick={this.submitApplication.bind(this)}>
            Sign me up!
          </button>
        </section>
        <section id="ThanksDialog" className={this.state.dialogClass}>
          <div className="message">
            <h3>Thanks for Signing Up</h3>
            {message}
            <button onClick={(event) => this.setState({ dialogClass: "" })}>
              Close
            </button>
          </div>
        </section>
      </main>
    );
    }
}
Dynamic “Forms”
Form to Add Question
Will create a new component to add/edit questions to Quiz-O-Matic
Need to take in text for the question, each of the choices and indicate the correct choice.
Initial Mockup
Example branch classComp4

Lot’s of Pieces
Form component quickly become complicated!
- Text area
<textarea>for question - Inputs
<input>for each choice - Buttons for deleting choices, adding choice, adding question
- Select
<select>for choosing the answer
Design 1
Keep all the form info in the component state:
class AddQuestion extends React.Component {
  constructor(props) {
    super(props); // Must call
    this.state = {
      question: "When can you store plaintext passwords on the server?",
        choices: ["If I feel like it", "sometimes", "never"], answer: 2};
  }

  render() {...}
}
Design 2
No “functionality” yet since no event handling:
render() { //familiar pattern below!
    let choiceItems = this.state.choices.map(function(choice, i) {
        return <li  key={"choice"+i}>
            <button>Delete</button><span>   </span>
            <input value={choice}/>
        </li>
    })
    const letters = "abcdefghi";
    let options = this.state.choices.map(function(choice, i){
        return <option key={"opt"+i} value={i}>{letters[i]+". "}</option>;
    }) //familiar pattern here too!

  return <div className="addQComp">
      <p>Question</p>
      <textarea value={this.state.question}></textarea>
      <p>Choices</p>
      <ol style={{listStyleType: "lower-alpha", paddingLeft: "1em"}}>
      {choiceItems}</ol>
        <p><span>Answer:</span>
        <select value={this.state.answer}>{options}</select></p>
      <p><button>Add Choice</button><button>Add Question</button></p>
  </div>;
}
Updating Text Area
Branch classComp5
- Add a handler for changes to the text area:
textAreachange(event){
  this.setState({question: event.currentTarget.value});
}- Add an
onChangeattribute to the text area:
<textarea value={this.state.question} onChange={this.textAreachange.bind(this)}/>this, Arrays, and bind()
Updating Choices 1
Issues:
- Variable number of possible choices
- Need to update state within an array
Updating Choices 2
Event Handler for choice <input> change:
choiceChange(i, event) {
  // Creates a new modified array of choices
  let newChoices = this.state.choices.map(function(choice, index){
    if (index === i) { // Only changes a particular choice
      return event.currentTarget.value; // from the <input> element
    } else
      return choice;
  })
  this.setState({choices: newChoices}); // update state
}
Updating Choices 3
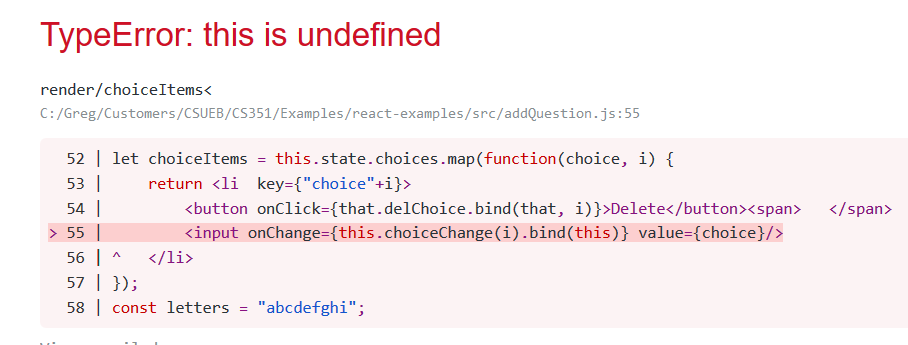
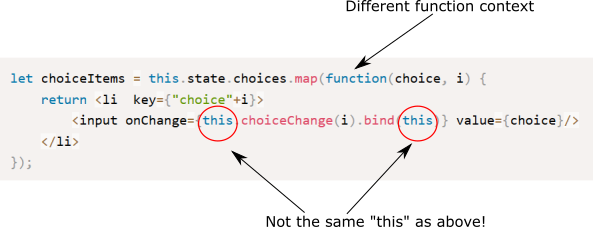
The following from render doesn’t work for multiple reasons!
let choiceItems = this.state.choices.map(function(choice, i) {
    return <li  key={"choice"+i}>
        <input onChange={this.choiceChange(i).bind(this)} value={choice}/>
    </li>
});
Updating Choices 4

Why?
In a different function context!

Closure Based Fix
Put this in a variable with a different name for safekeeping. Also see proper use of bind with additional variable i.
let that = this;  // Saves this into another variable for use below
let choiceItems = this.state.choices.map(function(choice, i) {
    return <li  key={"choice"+i}>
        <button onClick={that.delChoice.bind(that, i)}>Delete</button><span>   </span>
        <input onChange={that.choiceChange.bind(that, i)} value={choice}/>
    </li>
});
Modifying a state Array
Adding a “choice” 1
JSX for add choice button, and add question button:
<p><button onClick={this.addChoice.bind(this)}>Add Choice</button>
  <button onClick={this.addQuestion.bind(this)}>Add Question</button></p>
Adding a “choice” 2
Event handling code, note use of array method:
addChoice() {
  // concat method create a new array with added element
  this.setState({choices: this.state.choices.concat("")});
}
Deleting a Choice 1
JSX for delete choice buttons, note bind with i:
let choiceItems = this.state.choices.map(function(choice, i) {
    return <li  key={"choice"+i}>
        <button onClick={that.delChoice.bind(that, i)}>Delete</button><span>   </span>
        <input onChange={that.choiceChange.bind(that, i)} value={choice}/>
    </li>
});
Deleting a Choice 2
Event handling code, note use of array filter method:
delChoice(i) {
  // filter produces a new array
  let upChoices = this.state.choices.filter(function(choice, index){
    if(index === i)
      return false;
    else
      return true;
  })
  this.setState({choices: upChoices});
}
Function Call Up!
Quiz-o-Matic Questions Update
- Want the
AddQuestioncomponent to be able to add a question to the app. - The
questionsarray is part of its parents state so it can’t modify it - What can we do? Pass a method down to update
questions.
addQuestion() on Quiz-o-Matic
class QuizOMatic extends React.Component {
  constructor(props) {
    super(props); // Must call
    // a member variable called "state" to hold the state as a JS object
    this.state = {
      show: "addQ", questions: questions,
      user: "CS351", score: "0/0", minutes: 12
    };
  }

  addQuestion(q) { // Take a multiple choice question as input
    this.setState({questions: this.state.questions.concat(q)});
    // Show the quiz so we can see it
    this.setState({show: "quiz"});
  }
  // other stuff
  render(){...}
}
Pass addQuestion() down
Part of render():
switch (this.state.show) {
  case "intro":
    contents = <Intro user={this.state.user} takeQuiz={this.quizHandler.bind(this)}/>;
    break;
  case "quiz":
    contents = <Quiz questions={this.state.questions} gradeIt={this.resultHandler.bind(this)}/>;
    break;
  case "summary":
    contents = <Summary user={this.state.user} score={this.state.score}
                        minutes={this.state.minutes} again={this.quizHandler.bind(this)}/>;
    break;
  case "addQ": // Passing addQuestion method down here.
    contents = <AddQuestion addQuestion={this.addQuestion.bind(this)}/>;
    break;
  default:
    contents = <h2>Warning something went wrong!!!</h2>;
}
Using the passed method 1
AddQuestion component event handler:
addQuestion() { //Too many functions with the same name?
  // Put local state into nicely formatted object
  let q = {question: this.state.question, choices: this.state.choices,
    answer: this.state.answer};
  // Call passed down function with new question object
  this.props.addQuestion(q);
}
Using the passed method 2
Portion of AddQuestion render:
<p><button onClick={this.addChoice.bind(this)}>Add Choice</button>
  <button onClick={this.addQuestion.bind(this)}>Add Question</button></p>